Settings
The Settings view is where you can configure various settings to be used when executing workflows.

Secrets
Secrets of the format ${{ secrets.mySecret }} are extracted from all workflow files and shown in the Settings view. These secrets can be assigned a value using the Edit action and the values visibility can be toggled using the Show/Hide action. After assigning a value, it must also be checked so that it can be used during execution. During the execution, act will include all checked secrets that have a value assigned using the --secret option which specifies just the key of the secret (ie. --secret mySecret). The value for all secrets will be included as an environment variables in the process tied to the VS Code task.
An alternative to assigning values to these secrets in the Settings view is to use the Create Secret File action to create a file for storing these secrets (default file name is .secrets). This file should use the Ruby’s gem dotenv format as act uses the godotenv library to parse these types of files.
Example .secrets file:
export mySecret='my-secret-value'PRIVATE_KEY="---...\nrandom text\n...---"JSON="{\n\"name\": \"value\"\n}"SOME_SECRET=SOME_SECRET_VALUEIn the case, you already have a file containing these secrets, you can use the Locate Secret Files action to load them into the Settings view. Although you can have multiple secret files added to the Settings view, you can only select one to be used for execution. Upon selecting one and running a GitHub Action, act will include it using the --secret-file option which specifies the path to the secret file.
Click here to learn more about how secrets can be passed to act.
Variables
Variables of the format ${{ secrets.myVariable }} are extracted from all workflow files and shown in the Settings view. These variables can be assigned a value using the Edit action just like secrets and must be checked for it to be used during execution. During execution, act will include them using the --var option which specifies the value for a variable (ie. --var myVariable=myValue).
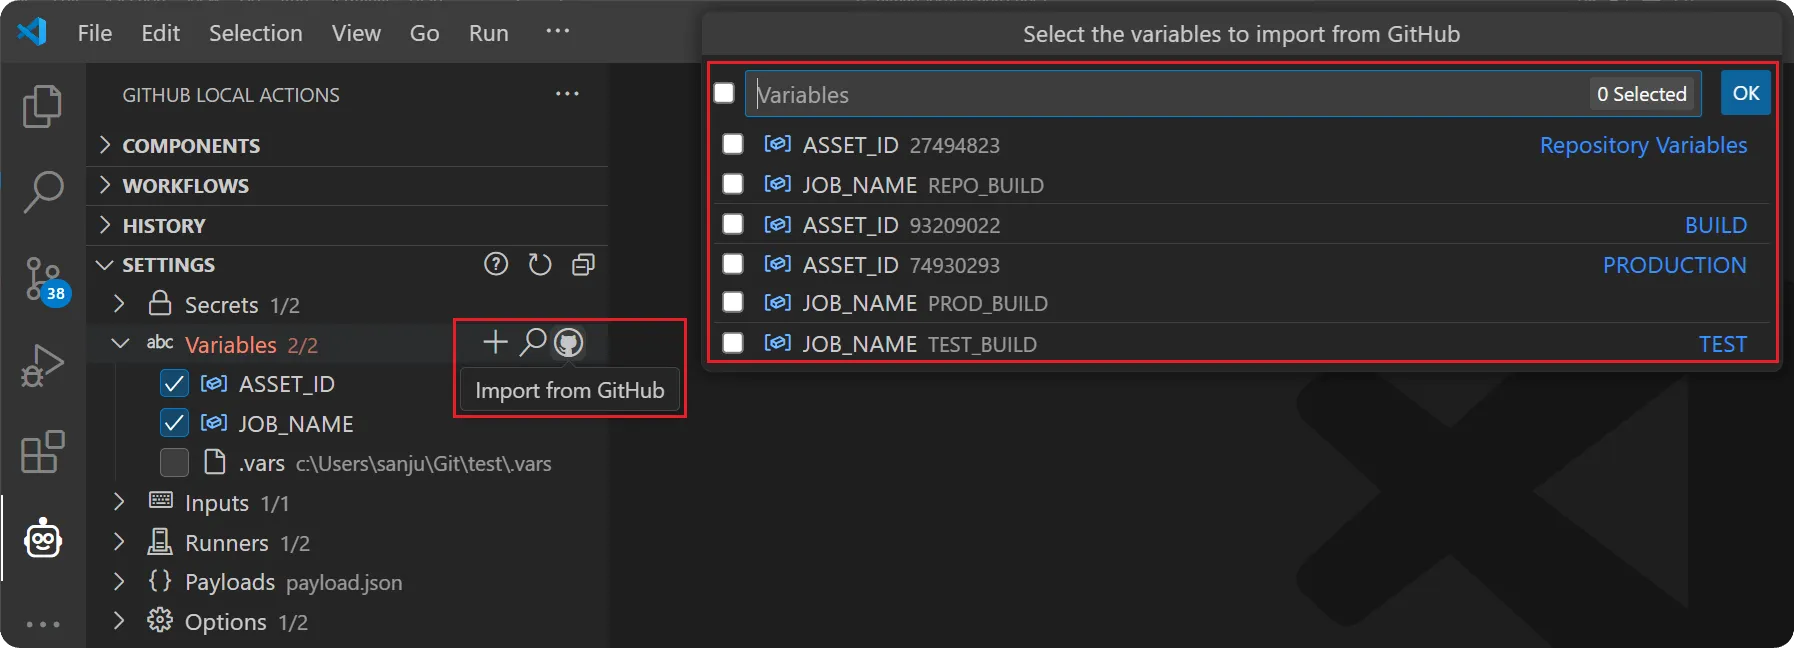
If you have matching repository or environment variables defined in GitHub and would like to use the same values locally, you can use the Import from GitHub action to authenticate and load these values into the Settings view. You must ensure your GitHub account has the adequate authority to access these variables to use this action.
Similar to the secrets file, an alternative is to use the Create Variable File action to create a file for storing variable values (default file name is .vars). This file should also use the Ruby’s gem dotenv format as act uses the godotenv library to parse these types of files too.
Example .vars file:
export myVariable='my-variable-value'JSON="{\n\"name\": \"value\"\n}"SOME_VARIABLE=SOME_VARIABLE_VALUEAlthough you can also use the Locate Variable Files to load in multiple existing files just like you can with secrets, you can only select one to be used for execution. Upon selecting one and running a GitHub Action, act will include it using the --var-file option which specifies the path to the variable file.
Click here to learn more about how variables can be passed to act.
Inputs
Inputs of the format {{ inputs.myInput }} and {{ github.event.inputs.myInput }} are extracted from all workflow files and shown in the Settings view. The features for managing these inputs are very similar to the features for managing variables described above. Refer to that section for more details and note the following differences:
- Act will use the
--inputoption which specifies the value for an input (ie.--input myInput=myValue). - Act will use the
--input-fileoption which specifies the path to an input file (default file name is.input). Example.inputfile:export myInput='my-input-value'JSON="{\n\"name\": \"value\"\n}"SOME_INPUT=SOME_INPUT_VALUE - Instead of using an input file, inputs can also be specified in a payload file as well. Refer to this example JSON payload file named
payload.json:{"inputs": {"NAME": "Manual Workflow","SOME_VALUE": "ABC"}}
Click here to learn more about how inputs can be passed to act.
Runners
When running workflows in GitHub, virtual environments are used. For act to run workflows locally, it must run a container for the runner defined in your workflow file. There are several default images which act uses for this based on runner type and size.
The Edit action can be used in the Settings view to specify a different image for a runner. This will use the --platform option which specifies a custom image to use per platform (ie. --platform <platform>=<docker-image>). For example, if your workflow uses ubuntu-18.04, consider the below example which changes the Docker image used to run the workflow:
act --platform ubuntu-18.04=nektos/act-environments-ubuntu:18.04Click here to learn more about how runners can be passed to act.
Payloads
When running GitHub Actions, in some cases your workflows may rely on event properties. In this case, you will have to provide these properties as an event payload.
For example, to partially simulate a pull_request event, you should provide at least the head_ref and base_ref. These values can then be accessed in your workflow file using ${{ github.event.pull_request.<...> }}. These properties can be set using an event payload file (payload.json) with content such as the following:
{ "pull_request": { "head": { "ref": "sample-head-ref" }, "base": { "ref": "sample-base-ref" } }}This file can be created using the Create Payload File action in the Settings view and must be checked for it to be included during execution. Checking it will cause the act command to use the --eventpath option which specifies the path to the event payload file.
Click here to learn more about how payloads can be passed to act.
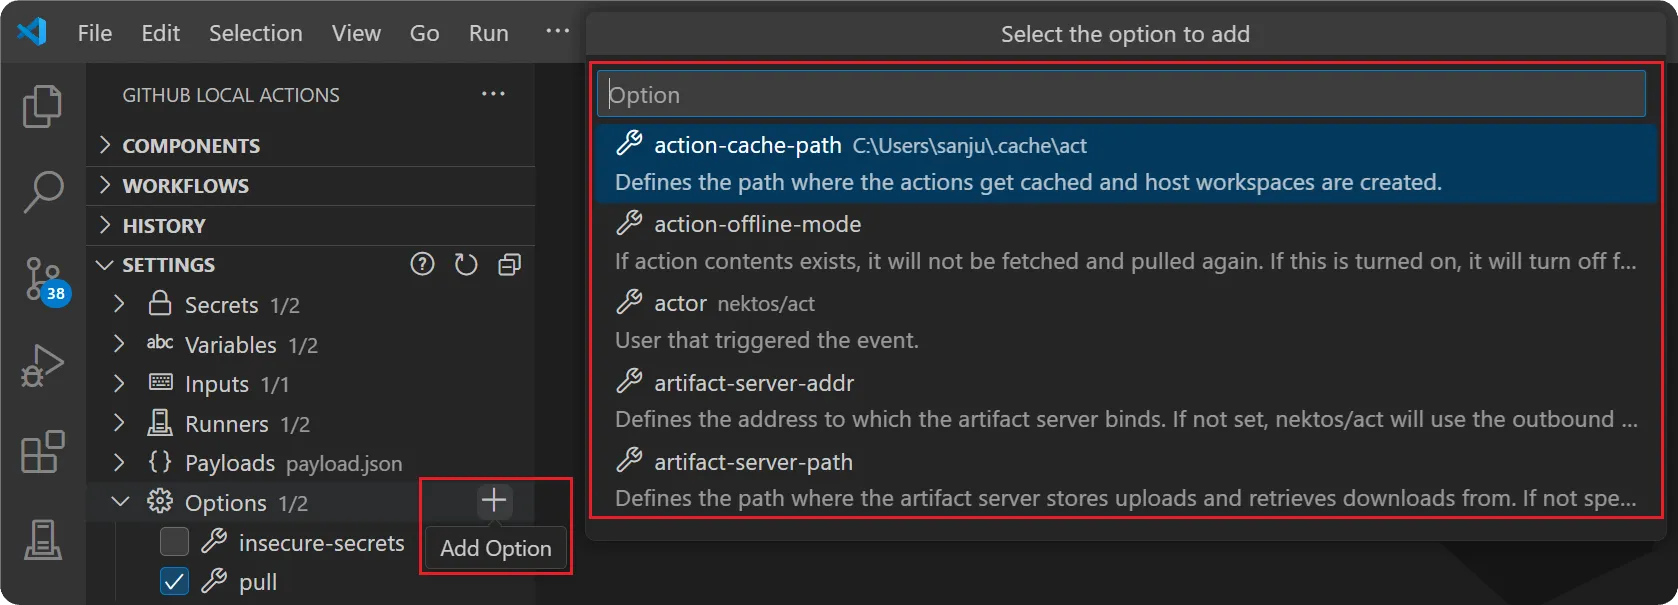
Options
Act provides several other options which can be used to configure how workflows are run. This includes configuring how cache is handled, where artifacts are stored, what container options to use, and much more. To include any of these options during execution, use the Add Option action and select the desired options. For certain options, values will need to be specified.
The list of available options are the same options listed when running act’s help command:
act --help